Page 1 of 1
newbie r65 fork rebuild
Posted: Wed Mar 18, 2015 9:54 am
by JJH
Hi I am new to both motorcycling and to BMW motorcycles. I picked up a 1979 r65. One of the forks is leaking, I have researched these forks and found one of rings is most likely bad or dissolved or ready to be replaced in addition to the leaking seal. The question I have is do I need to remove the entire forks from the bike, or can I just remove the sliders and work with the forks still mounted on the bike. I am trying not to learn how to perform a fork alignment if I don't have to. Thanks.
Re: newbie r65 fork rebuild
Posted: Wed Mar 18, 2015 10:03 am
by SteveD
This procedure works for the 81 on R100.
May adapt to the 650???
No, just remove the legs.
Changing BMW fork Seals/ springs/ gaiters/ oil
Nomenclature: I call the chromed tube the fork tube. The fork leg is the lower forged bit that the calipers attach to.
1. Put new seals in the freezer for 1 hour beforehand.
2. Loosen, remove, the top fork bolt to allow drainage and refill of fork oil..move h/bars to get to bolt.
2a. To replace the springs, you need to remove the large hex bolt at the fork top, therefore no need for point 2. That bolt is very tight and easy to round off. Make sure your tool fits well.
3. Remove the lower drainage small bolt. Allow oil to drain.
3a. Replace springs, loosely replace top bolt.
4. Disconnect brake calipers from fork legs...hang carefully.
5. Loosen, don't remove, the retaining bolt at the bottom of the fork. Better leverage before the axle comes out.
6. Remove axle/wheel/front guard.
7. Now remove retaining bolt, drop fork leg down, leaving the fork tube on the bike. Remove old gaiters/boots.
8. Clean fork leg internals.
9. Carefully lever out the old seal. I use a blunted straight screwdriver. Insert the cold new seal, use old seal to push new seal in.
10. Slide upper gaiter spacer then gaiters onto fork tube.
11. Install fork leg with new seal carefully over the fork tube..
12. etc, etc...both sides
13. Reinstall drain bolt, refill oil, tighten top bolt.
14. wheels etc back on...
15. fiddle with the gaiter spacer, locate it into the breather tube on the inside of the lower triple clamp.
One hour max. Quicker the next time.
Re: newbie r65 fork rebuild
Posted: Wed Mar 18, 2015 12:02 pm
by Duane Ausherman
I suggest that you first measure the stiction of the forks. This is generally a measure of the alignment. Once finished, measure it again to be sure that you didn't add to the misalignment issue.
Make notes, take photos etc.
Re: newbie r65 fork rebuild
Posted: Wed Mar 18, 2015 12:58 pm
by Rob
Here are photos from my '79 R65:
http://www.pbase.com/tomfarr/front_fork
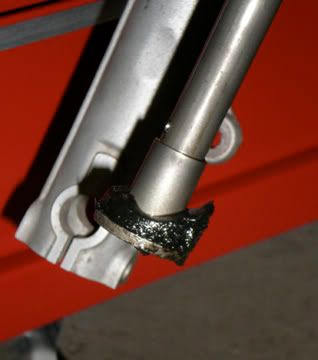
It is quite possible that one or both nylon bumper rings have disintegrated, lying in the bottom of the leg in bits.
To take the fork leg apart, first, Remove the front wheel, fender, fender brace and brake caliper(s).
Drain the oil using the small drain screws on the rear of the sliders.
Be Careful of the small drain screws, the threads on the fork legs will strip out easily. Forget torque specs when replacing. Use a small wrench and common sense.
Next, at the top of the fork legs (you might have to move the handlebars out of the way) you have to remove the plastic cap (if there). Underneath you will see a large allen screw head. This is the top of the cap holding the spring in place. It is held in place by a large ring clip.
Put an appropriate-size allen socket on a heavy torque wrench handle. This will allow you to push down on the allen screw at the top of the fork leg.
With the spring cap recessed, grab your awl, and pick out the ring clip that holds the spring cap in place.
Extract the spring. It is possible that a PO put a piece of PVC pipe on top of the spring, but doubtful.
Now you will need a very long extension for your ratchet wrench with 13mm socket, to reach the
top of the damper rod.
While you are loosening the from the top, you need to hold another allen head fastener from the bottom of the leg.
With those two fasteners separated, you should be able to remove the slider from the leg.
In my case,
the damper rod came out with the slider on the left side, but hung up in the fork leg on the right. I don't remember what I did to resolve it, but it was probably no big deal.
Link to microfiche on RealOEM:
http://www.realoem.com/bmw/showparts.do ... g=31&fg=42
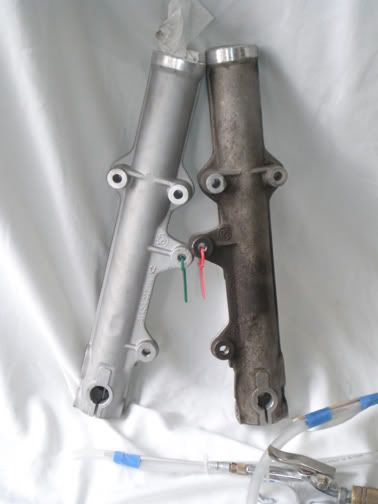
The bumpers and seals are the only real consumables. Try and get BMW 8.5 fork oil for reassembly. Clean those fork sliders well on the inside. I took mine to a blaster and had them cleaned (walnut shell?). They looked great.
It looks like you will also need a pair of circlip pliers for the bottom of the damper assy.
You should check out R65.org sometime.
Re: newbie r65 fork rebuild
Posted: Wed Mar 18, 2015 1:57 pm
by barryh
JJH wrote:Hi I am new to both motorcycling and to BMW motorcycles. I picked up a 1979 r65. One of the forks is leaking, I have researched these forks and found one of rings is most likely bad or dissolved or ready to be replaced in addition to the leaking seal. The question I have is do I need to remove the entire forks from the bike, or can I just remove the sliders and work with the forks still mounted on the bike. I am trying not to learn how to perform a fork alignment if I don't have to. Thanks.
I have the exact same year and model of fork and there are a couple of unusual things to look out for. Before diving into the forks, do you have any clonking or topping out noise ? Dissolved bumpers are one cause but there can be a lack of rebound damping. I would recommend that you remove the fork springs before draining the oil and then with the wheel and fender off, stroke each fork leg by hand. You should feel substantially more rebound damping than compression damping and you should feel a further increase in rebound damping over the last inch of fork extension.In the absence of a topping out spring which these forks don't have, that increase in damping is your hydraulic bump stop. If you don't feel that increase you may experience a topping out clonk. Another potential source of noise is that the valve if original will be retained in the bottom of the stanchion by a large circlip possibly with shims. The valve body should exhibit no free play when you attempt to move it up or down and if there is any play at all you need to insert a shim between the circlip and valve body. You'll see the shims listed on the parts fiche.
Re: newbie r65 fork rebuild
Posted: Wed Mar 18, 2015 2:24 pm
by montmil
What Rob sez.
You'll need 12-14 inches of socket extension to reach down into the fork. A 1/4" drive is plenty adequate. It's possible to hold the upper socket wrench and turn the Allen wrench poked into the fork lower by yourself. Just gotta hold your tongue just right...
BTW, your R65 has that spring clip holding the top caps in place. It's easy to remove by pushing down on one side with a small screwdriver; getting the clip in a vertical position and lifting it out. That little Jesus clip is not fitted in a groove. The upper portion that holds the clip has a square lip while the lower has a taper. That what makes it easy to tilt and extract.
With the lowers off, consider rinsing out the inside using kerosene or mineral spirits. Lots of crud may wash out. Here's what was left of the "topping out" bumper in one of my R65s. OEMs were black rubber. New ones are a semi-hard white nylon-ish stuff.
Fork lowers cleaned up nicely using a DIY soda blaster. Ten minutes each lower and a buck for a box of baking soda. Makes a real mess so work outside. Baking soda will dissolve when rinsed away with water.
http://www.aircooledtech.com/tools-on-t ... a_blaster/
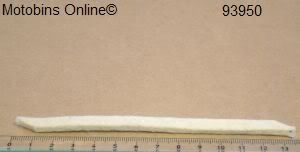
Use care not to damage the aluminum as you remove the old seals. Look into the fork lower and you will likely see a wrap of oily felt. Replace these prior to installing the new seals.
No need to freeze the oil seals. Lightly oiled the outside rim of the seal. Line 'em up square to the bore. Get 'em started with finger pressure, then tap them in using a large socket. Oil the new seals inner lip before going back onto the chrome legs -which you have carefully checked for any spurs that may damage the new seals.
Link to all things R65:
http://www.bmwr65.org/
Re: newbie r65 fork rebuild
Posted: Wed Mar 18, 2015 5:48 pm
by JJH
Okay, thanks for all help! This is my first motorcycle and I'm just learning the ropes on how to wrench on these things.
Re: newbie r65 fork rebuild
Posted: Wed Mar 18, 2015 7:01 pm
by SteveD
JJH wrote:Okay, thanks for all help! This is my first motorcycle and I'm just learning the ropes on how to wrench on these things.
Velcome to airheads then!...and boxerworks.
These bikes don't like too much torque on their fasteners. You'll need an accurate torque wrench. You'll also need to know torque values and what can change them. It'll save you time and money and lots of future annoyance if you avoid damaging threads.
Re: newbie r65 fork rebuild
Posted: Wed Mar 18, 2015 7:21 pm
by Duane Ausherman
JJH, welcome to the "home"
Just know that far more damage to a BMW is caused by over tightening than under tightening.


